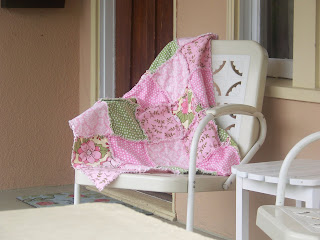
I sometimes need a kick in the pants to get back into sewing, and visiting a friends newborn little girl gave me that kick this week. I went straight to the fabric store for some inspiration, and found the cutest flannels and decided on a rag quilt. It turned out so cute and was pretty easy to make. Here are the dirctions I used:
Rag Quilt Directions:
DO NOT PRE-WASH FLANNEL OR BATTINGRead through all directions before beginning.
1. Cut 8” squares out of all your prints.
2. Take two squares of the same print (wrong sides together) and stitch together with a 1/2" seam. (Optional – put 8” square of batting between the 2 pieces before stitching. After stitching a 1/2" seam around the edge, open the seam and trim away batting close to the seam without cutting seam. Top stitch an “X” over the block going from corner to corner.)
3. Lay your sewn squares out to create your design (this quilt is 5 squares by 5 squares.).
4. Sew the blocks together in strips. Do this by sewing the squares together with a 1/2" seam placing the backs of each square together and stitching. (I pinned my squares into strips and then sewed them together.)
5. Once the strips are sewn together, sew the strips to one another with 1/2" seams and backsides together. Pin strips together being sure to match seams. (When matching seams pin first strip with seams pressed down and second strip seams pressed up.)
6. Snip each seam and entire outer perimeter of quilt edge. Snip at 1/2” intervals and to within 1/8” of all seams. Be careful not to cut into the stitching.
7. Now wash your rag quilt in warm water and detergent. Use no fabric softener (yet).
8. Shake quilt well before drying (no dryer sheets). Clean lint trap once or twice during drying.
10.Repeat wash and dry only this time, use fabric softener or dryer sheets. Clean lint trap half way thru.


Your rug quilt turned out so nicely! Thank you for visiting my link party!
ReplyDelete