Tuesday, April 20, 2010

Tulle Heaven!

This year I am in charge of our annual entry for the local parade for my daughter's preschool.  I took on this task 2 years ago and while it is tons of work, it is fun and exciting to see all the little kiddies in their costumes.  The theme for the parade is Rose Pedals (as in bike pedals).  The theme of our entry is "Rose Bud Racers".  We are going to have kids on bikes and kids walking dressed in rose outfits.  The girls are going to wear tulle skirts and all kids will have a rose bud hat.  I am trying to make it easy for everyone to help out, so I have simplified the directions on how to make a tulle skirt and thought I would share it here :o) 


First, measure your child's waist and cut 1" elastic to that length.  Sew the elastic into a loop using the zig zag stitch (I went across mine twice).  


Measure 24" and cut 46 pieces of 6" tulle (you may need more or less depending on how large your elastic is).  It takes almost 2 rolls of the 25 yard length tulle that can be found in the wedding section of the fabric store.


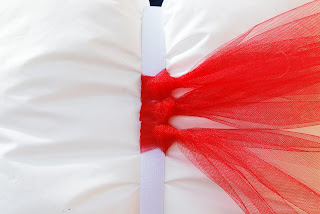
Wrap the elastic band around a small pillow or your leg.  This makes it much easier to tie the tulle on.


Fold the tulle in half and working from the left, push the folded end under the elastic.


Push the cut end of the tulle through the loop and pull tight to the right.


Keep tying the tulle on making sure you keep the knots tight together so there are no gaps.


And Twirl!!

Monday, April 12, 2010

Owl Pillow

I am totally obsessed with Owls as decorations for kids rooms.  I designed a baby shower invitation with the cutest little owl guy on it and the mommy to be loves it.  I'm not sure what it is, I just love the idea of using a more non-baby type decoration.  Here is the invitation I did:

 I thought he was so cute I wanted to use him somewhere else, and decided to make my first applique pillow for Mia's room.  She has a new comforter that is more bold than her usual light pink & green one.  It has magenta, bright green and some black.  For this pillow I just used a bunch of scrap pieces I had laying around.  He turned out so adorable I want to make more! 


So adorable and he matches perfectly :o)

Thursday, April 8, 2010

A skirt for mommy!

I found this fabric that I fell in love with and found a remnant of it for $2!  I decided to finally make something for myself since, as you can see everything I make is for my daughter.  I was inspired by my favorite blogger Disney at Ruffles & Stuff and combined a couple skirts she just made into my new creation.  Here is a quick tutorial of how I made this quick and easy skirt.


 Here is the fabric I found, totally cute and funky :)


First thing I did was measure my hips and calculated 1.5x the width.  With my fabric I created 2 panels that equaled that waist measurement.  Next I found an old T-shirt that didn't quite fit any longer and cut 6" off the bottom.  This is going to be the waist band.  Since this shirt was a bit snug on my tummy, I just used it as is, but if yours is loose, pin and sew it so it is tight.

Next I sewed the right sides together of the skirt panels up the sides.  Then folded the bottom twice to create the hem.


Next sew a gathering stitch at the waist.  Since my skirt had 2 panels, I sewed a gathering stitch on each side.


(Of course I didn't take a pic of the difficult part!)  Next turn the skirt to right side and pull gather to match the width of the waist band.  Slip the band over the top of the skirt with the raw edge meeting the raw edge of the skirt.  Pin into place and sew. 

Then all done!  You can wear it with the band up high or fold it over for a smaller waist band.